Dynamic mask 动态遮罩 II
在上一篇教程
//counter = -1;
// 创建遮罩
_root.createEmptyMovieClip(‘line’, 0);
animInt = setInterval(doAnim, 17);
animDir = 1;// 用来控制方向的变量
// 定义函数
function doAnim()
{
var currMC = _root.line;
var time = animIndex/60;
var dist = time;
with(currMC)
{
// c 曲线的位置: (150, 25), (25,100), (150,175)
// j 曲给的位置: (150, 25), (125,200), (50,125)
clear();
lineStyle(0x000000);
moveTo(150,25);
curveTo(25+100*dist,100+100*dist,150-100*dist, 175-50*dist);
}
animIndex += animDir;
if(animIndex >= 60)
{
animDir = -1
}
if(animIndex <= 0)
{
animDir = 1
}
}
这段代码中是将 c 曲(150,25)(25,200),(150,175)变形为 J 曲线(150, 25), (125,200), (50,125)
注意,这段代码只能在 FLASHMX 中运行。如果想在 FLASHMX2004 中运行,你需要在定义一下 animIndex 在 animDir=1;下面加入一行 var animIndex=0; 测试你的影片,观看结果。
// 创建影片剪辑和遮罩 function createMovieClip() function doAnim() 代码: // 全局变量决定于你的影片宽度
mWidth = 400;
counter = -1;
createMovieClip();
animInt = setInterval(doAnim, 17);
{
counter++;
attachMovie(‘pic’ add (counter % 2), ‘pic’ add counter, counter);
createEmptyMovieClip(‘mask’ add counter, counter + 10000);
this[‘pic’ add counter].setMask(this[‘mask’ add counter]);
}
{
var currMC = _root[‘mask’ add counter];
if(animIndex < 15)
{
var time = animIndex/15;
var dist = 0.5*Math.sin(Math.Pi*(time-0.5)) + 0.5;
with(currMC)
{
clear();
beginFill(0x000000);
lineTo(mWidth,0);
lineTo(mWidth,dist*125);
curveTo(250,dist*40,0,10*dist);
endFill();
}
}
else if (animIndex < 35)
{
var time = (animIndex-15)/20;
var dist = 0.5*Math.sin(Math.Pi*(time-0.5)) + 0.5;
with(currMC)
{
clear();
beginFill(0x000000);
lineTo(mWidth,0);
lineTo(mWidth,125);
curveTo(250-100*dist,40+150*dist,0,10+190*dist);
endFill();
}
}
else if (animIndex <= 50)
{
var time = (animIndex-35)/15;
var dist = 0.5*Math.sin(Math.Pi*(time-0.5)) + 0.5;
with(currMC)
{
clear();
beginFill(0x000000);
lineTo(mWidth,0);
lineTo(mWidth,125+75*dist);
curveTo(150,190+10*dist,0,200);
endFill();
}
}
animIndex++;
if(animIndex > 50)
{
animIndex = 0;
_root[‘pic’ add (counter – 1)].removeMovieClip();
_root[‘mask’ add (counter – 1)].removeMovieClip();
createMovieClip();
}
}
这段代码使用了两个函数,createmovieclip 用来将图片贴加到场景中并设置 MASK,cunter 用来跟踪图片的实例名称。
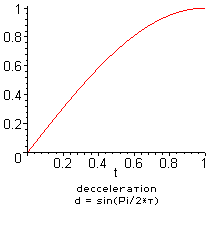
Doanim 函数被每 20 豪秒调用一次,整个遮罩形成过程与范例上一个例子一样分成三部执行。对于缓动方式你可选择其它的方式,只需要将 DIST 的值改为其它的公式就可以。
本文源代码下载:
总结:在这两篇教程中我们先后学习了基本的动态遮罩,和动态绘制曲线来形成遮罩,两者基本的原理相同,尤其你应注意的是如何加入 easing,bouncing 等等。我想这对你可能是有用的。